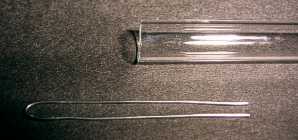
 I start with a length of 8mm diameter thin wall tube and an 80mm length of 0.5mm diameter
nickel/iron wire (Ni48/Fe52). The wire is folded double. I bend the wire until the lengths
are parallel and 1 to 2 mm apart.
I start with a length of 8mm diameter thin wall tube and an 80mm length of 0.5mm diameter
nickel/iron wire (Ni48/Fe52). The wire is folded double. I bend the wire until the lengths
are parallel and 1 to 2 mm apart.
| Previous Page | Glass Blowing Menu | Main Menu | Next Page |
|---|
This is not strictly a panel neon, because at the time of writing, I have no way of filling it with neon gas. It can only be air filled.
I start with a length of 8mm diameter thin wall tube and an 80mm length of 0.5mm diameter
nickel/iron wire (Ni48/Fe52). The wire is folded double. I bend the wire until the lengths
are parallel and 1 to 2 mm apart.
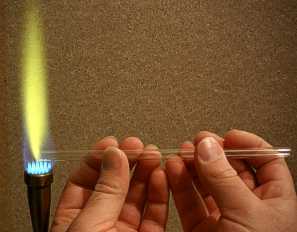 I then introduce the cut end of the tube to the flame slowly in a horizontal position.
I rotate the tube with just the last 10mm in the flame. When it reaches the consistency
of Plasticine, I remove it from the flame and squash it slightly between two pieces of
graphite. The end should not be completely closed. It is best to proceeded immediately
to the next step without allowing the end of the tube to cool down. If it is allowed to
cool, great caution must be exercised when re-heating it to avoid cracking.
I then introduce the cut end of the tube to the flame slowly in a horizontal position.
I rotate the tube with just the last 10mm in the flame. When it reaches the consistency
of Plasticine, I remove it from the flame and squash it slightly between two pieces of
graphite. The end should not be completely closed. It is best to proceeded immediately
to the next step without allowing the end of the tube to cool down. If it is allowed to
cool, great caution must be exercised when re-heating it to avoid cracking.
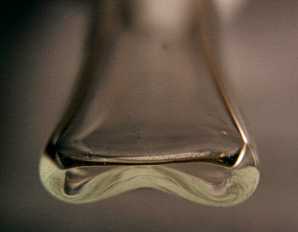 This is how the end of the tube looks after squashing it. The purpose of this step
is to keep the lead-in wires centred while sealing them in.
This is how the end of the tube looks after squashing it. The purpose of this step
is to keep the lead-in wires centred while sealing them in.
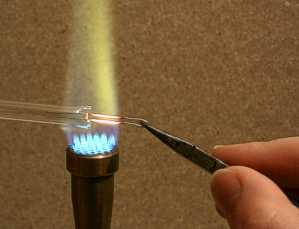 I then hold the tube horizontally with the squashed end horizontal. The free ends of the
Ni/Fe wire are inserted so that they pass about 22mm into the tube. I hold the wire with
a pair of pliers and heat the end of the tube until the wires stick to the glass. When this
happens, I turn the gas up high and keep turning the tube over in the flame until the
end is red hot. I then squash the end of the tube flat between two flat pieces of graphite.
I then immediately return it to the flame and heat it red hot again.
I then hold the tube horizontally with the squashed end horizontal. The free ends of the
Ni/Fe wire are inserted so that they pass about 22mm into the tube. I hold the wire with
a pair of pliers and heat the end of the tube until the wires stick to the glass. When this
happens, I turn the gas up high and keep turning the tube over in the flame until the
end is red hot. I then squash the end of the tube flat between two flat pieces of graphite.
I then immediately return it to the flame and heat it red hot again.
 I try to ensure that at least the last 2mm of tube fuses together completely. When using
Ni/Fe wire, the formation of bubbles is a good indication that the glass is hot enough. No
bubbles indicates a leaky seal. I then anneal the seal carefully and then insulate it with
ceramic wool. I allow it to cool slowly for at least ten minutes.
I try to ensure that at least the last 2mm of tube fuses together completely. When using
Ni/Fe wire, the formation of bubbles is a good indication that the glass is hot enough. No
bubbles indicates a leaky seal. I then anneal the seal carefully and then insulate it with
ceramic wool. I allow it to cool slowly for at least ten minutes.
For the next step, something heat proof is required, to hold the device during
the sealing operation.
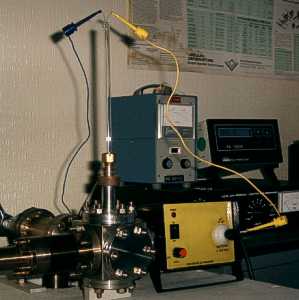 The tube is then attached to the pump. Only a rotary pump is required. The pressure
needs to be reduced to about 10mBar. The tube can be powered on the pump to assess the
appearance of the discharge at different pressures. When the tube is at the desired
pressure, I valve it off and stop the pump.
The tube is then attached to the pump. Only a rotary pump is required. The pressure
needs to be reduced to about 10mBar. The tube can be powered on the pump to assess the
appearance of the discharge at different pressures. When the tube is at the desired
pressure, I valve it off and stop the pump.
I used the blow torch to seal off the tube. The tube must first be heated gently by
holding the flame near it. I then heat a short section just beyond the wires as evenly
as possible until it starts to collapse. The tube collapses much more suddenly than usual
because of the pressure acting on it. I try to get it to collapse evenly, but it is very
difficult. When it has fully collapsed and fused, I draw the tube away until it detaches.
I then immediately anneal it in the sooty flame and then wrap the whole device in ceramic
wool to cool for 15 minutes. Failure to anneal the seals at this stage has been the source
of many failures.
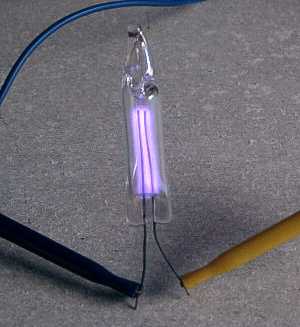 Unfortunately, because it is filled with low pressure air rather than neon gas, it requires
around 1000V to strike. This means that it can not be operated directly from the mains
supply as a panel neon can. If gas filling equipment were available it would be fun to try
different gas fillings. Flammable gas must never be used though.
Unfortunately, because it is filled with low pressure air rather than neon gas, it requires
around 1000V to strike. This means that it can not be operated directly from the mains
supply as a panel neon can. If gas filling equipment were available it would be fun to try
different gas fillings. Flammable gas must never be used though.
This tube was filled with air at 10mBar. It is 40mm in length. It is being powered by
my trusty 0 to 10kV high frequency power supply.
| Previous Page | Glass Blowing Menu | Main Menu | Next Page |
|---|