
X-Ray Equipment
DANGER: X-rays are a form of ionizing radiation and can cause severe tissue damage
and cancer. The high voltage required is also a serious hazard. I do not recommend
that you attempt to replicate the following experiment. Never attempt to X-Ray body
parts unless you are a qualified radiologist.
 I obtained a Philips Oralix 50 X-Ray head on eBay. It is designed for dentistry. The tube
in this head operates at 50kV with a beam current of 7.5mA. The control box was sold
separately, but I did not buy it because it is just a fancy timer. The head is completely
self contained with its own power supply and only needs a 240V mains supply to operate.
It is not rated for continuous use as there is no forced cooling. Extended use would
damage the tube.
The clear plastic cone at the front is where the X-Ray beam emerges. The cone is just a
collimator and distance gauging device. The mains connection and physical mounting is via
the black spigot on the right.
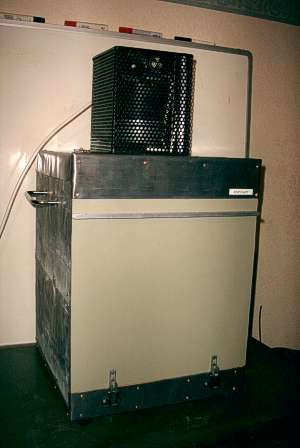 To make it safer to use, I removed the X-Ray head from its plastic casing and mounted it on
a lead shielded box with an interlocked steel door. The box is made from a wooden frame
covered with MDF board. The shielding is lead roof flashing, which is screwed to the wood.
The shielding is not perfect, so as an extra precaution, I operate it using a foot pedal
in the next room. The wall between the rooms is red brick and so provides good shielding
for 50kV X-Rays.
The perforated black box on the top contains the X-Ray head. The beam is pointing downwards
and enters the shielded box through a small hole. The head contains the X-Ray tube, high
voltage transformer and filament transformer. It is oil filled to provide the high degree
of electrical insulation required for operation at 50kV.
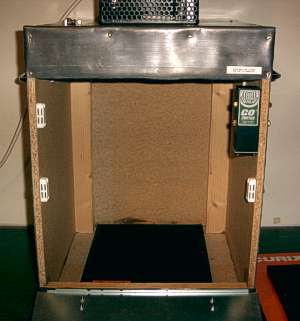 The steel front door is held shut by magnetic catches and hinges downwards. There is a
magnetic switch (top right) which prevents operation when the door is open. There is
also a sounder which bleeps when the X-Rays are on.
The film is placed in the bottom of the box in a cassette. This gives a tube to film
distance of about 500mm. This distance allows the beam to spread enough to expose 24cm
by 30cm film.
The object to be radiographed is placed on top of the film cassette. Exposure times vary
depending upon the object, but are typically 20 to 40 seconds. I found the best
exposure time for each object mainly by guesswork and some trial and error.
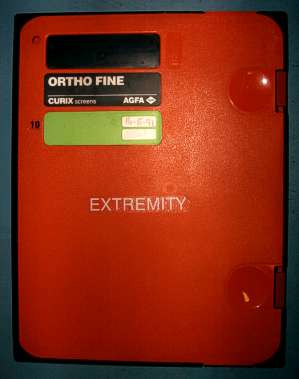 All pictures were recorded using a cassette incorporating enhancement screens. The X-Rays
cause the enhancement screens to fluoresce and the light exposes the film. Two types of
cassette were used. Most of the smaller items were X-Rayed using an Agfa Curix 18x24
green cassette, shown on the left. Larger items were X-Rayed using a Dupont Cronex 24x30
blue cassette. The Agfa cassette produces better results than the Dupont one and I have
since obtained a 24x30 Agfa cassette.
The cassettes have to be used the correct way up to avoid artifacts in the image. The
cassette shown has a label on the other side which reads 'tube side'.
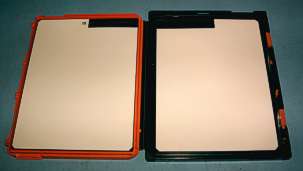 The cassette is light tight and held shut by the sliding catches on the right hand side.
When the catches are released, it hinges open like a book.
The film has to be loaded in a darkroom, but once the cassette is closed it can be exposed
to daylight. This makes it much easier to handle.
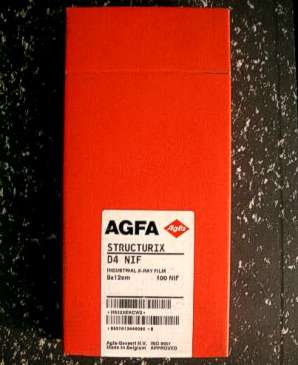 All the gallery images were recorded on standard black and white photographic paper except
the 13A plug and the filter which were recorded on Agfa Structurix D4 X-Ray film. A box
of 9cm x 12cm Agfa X-Ray film is shown on the left. Each box contains 100 sheets. It tends
to produce better contrast than standard photographic paper and also has the advantage of
being on a transparent backing which allows it to be exposed by both enhancement
screens.
Agfa Structurix is intended to be used with a special developer chemical, but I have found
that standard black and white photo paper developer works well. I have also used it with
a standard red safe-light with no obvious fogging. I developed it for 2 minutes using
Ilford Multigrade paper developer diluted 1+9 with water. I then fixed it for 3 minutes
using Ilford Rapid Fixer also diluted 1+9 with water.
 I obtained a Philips Oralix 50 X-Ray head on eBay. It is designed for dentistry. The tube
in this head operates at 50kV with a beam current of 7.5mA. The control box was sold
separately, but I did not buy it because it is just a fancy timer. The head is completely
self contained with its own power supply and only needs a 240V mains supply to operate.
It is not rated for continuous use as there is no forced cooling. Extended use would
damage the tube.
 To make it safer to use, I removed the X-Ray head from its plastic casing and mounted it on
a lead shielded box with an interlocked steel door. The box is made from a wooden frame
covered with MDF board. The shielding is lead roof flashing, which is screwed to the wood.
The shielding is not perfect, so as an extra precaution, I operate it using a foot pedal
in the next room. The wall between the rooms is red brick and so provides good shielding
for 50kV X-Rays.
 The steel front door is held shut by magnetic catches and hinges downwards. There is a
magnetic switch (top right) which prevents operation when the door is open. There is
also a sounder which bleeps when the X-Rays are on.
 All pictures were recorded using a cassette incorporating enhancement screens. The X-Rays
cause the enhancement screens to fluoresce and the light exposes the film. Two types of
cassette were used. Most of the smaller items were X-Rayed using an Agfa Curix 18x24
green cassette, shown on the left. Larger items were X-Rayed using a Dupont Cronex 24x30
blue cassette. The Agfa cassette produces better results than the Dupont one and I have
since obtained a 24x30 Agfa cassette.
 The cassette is light tight and held shut by the sliding catches on the right hand side.
When the catches are released, it hinges open like a book.
 All the gallery images were recorded on standard black and white photographic paper except
the 13A plug and the filter which were recorded on Agfa Structurix D4 X-Ray film. A box
of 9cm x 12cm Agfa X-Ray film is shown on the left. Each box contains 100 sheets. It tends
to produce better contrast than standard photographic paper and also has the advantage of
being on a transparent backing which allows it to be exposed by both enhancement
screens.